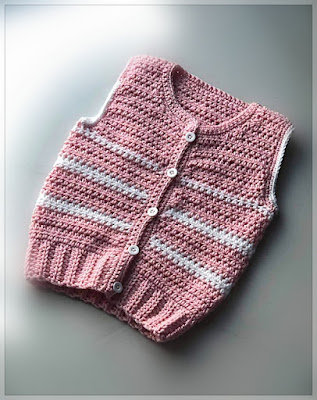
Directions are for size 3 months. Changes for sizes 6, 12, 18 and 24 months are in parentheses. When only one number is given in black, it applies to all sizes. Stitch counts are given in the parentheses at the end of the rows.
Sizing:
Sizes: 3, 6, 12, 18, 24 months
To fit chest: 16 (17, 18, 19, 20)”
Finished chest: 19 (20, 21, 22, 23)”
Materials:
• Worsted weight yarn : 4 (4, 5, 6, 7) Oz
• 5.5 mm and 5mm crochet hooks (or sizes needed to obtain the gauge)
• Stitch markers
• Yarn needle
• 5 buttons (2.5” diameter)
Abbreviations (American terminology):
• Ch = chain
• Sl st = slip stitch
• St/s = stitch/es
• Sc = single crochet
• Sc-blo = sc through back loop only
• Hdc = half double crochet
• Hdc2tog = hdc decrease over 2 stitches
• RS = Right side
• WS = Wrong side
Gauge:
• 12 hdc by 10 rows = 4” by 4”
• Hdc-blo 8 rows = 4”
Notes:
• Ch 1 does NOT count as a stitch.
Color coded, print friendly pdf available on Ravelry.
Pattern:
Hem ribbing:
With smaller hook, ch 5 (5, 6, 6, 7), hdc in 2nd ch from the hook and in each ch. (4, 4, 5, 5, 6 sts)
Row 2-38 (40, 42, 44, 46): Ch1, turn. Hdc in 1st st, hdc-blo to last st, hdc into last st.
Do not fasten off.
With larger hook, work across the long edge of the ribbing.
Row 1, (RS): ch 1, add 3 sc across 2 rows of the ribbing i.e. for every 2 rows of the ribbing, add 3 sc. (57,60,63,66,69 sts)
Row 2- 11(13, 15, 15, 17): ch 1, turn, hdc in each st.
Divide for front panels and back panel
Left panel:
Row 1: Ch 1, turn, hdc in next 11(12, 12, 13, 13) sts, [skip next 6(6, 7, 7, 8) sts and place a stitch marker. Skip next 29(30, 32, 33, 35) stitches from the marked st, and place another stitch marker in next st.]
Row 2-6(6, 6, 6, 8): ch 1, turn, hdc in each st. (11, 12, 12, 13, 13 sts)
Shape left neck:
Row 1: ch 1, turn, sl st in next 3(3, 4, 5, 5) sts, ch 1, hdc2tog over next 2 sts, hdc into the remaining sts. (7 sts)
Reduce 1 st every row at neck edge 2 more times (for all sizes). Work 2 (3, 3, 4, 4) more rows of hdc WITHOUT any decrease. Fasten off leaving a long tail for shoulder sewing. (5 sts)
Back panel:
Row 1: WS facing, join yarn at the 1st marked st, ch 1, hdc in 23 (24, 25, 26, 27) sts including the marked st.
Row 2-11(12, 12, 13, 15): Ch 1, turn, hdc in each st. Fasten off. (23, 24, 25, 26, 27 sts.)
Right panel:
Row 1: WS facing, join yarn at the 2nd marked st, ch 1, hdc in 11(12, 12, 13, 13) sts including the marked st.
Row 2-6 (6, 6, 6, 8): ch 1, turn, hdc in each st. (11, 12, 12, 13, 13 sts)
Fasten off.
Shape right neck:
Row 1: ch 1, turn, hdc into 6 (7, 6, 6, 6) sts, hdc2tog over next 2 sts, leave remaining stitches unworked. (7, 8, 7, 7, 7 sts)
Reduce 1 st every row at neck edge 2 more times (for all sizes). Work 2 (3, 3, 4, 4) more rows of hdc WITHOUT any decrease. Fasten off leaving a long tail for shoulder sewing. (5 sts)
Fold both the front panels over the back panel and sew the shoulders.
Neck Border, Button Band and Buttonhole Band:
(For rows 2-4, add 3 sc in the centre marked sts)
Right side facing, with larger hook, join yarn at the right front bottom.
Row 1: ch 1, add 28 (32, 35, 37, 41) sc evenly along front edge to top, add 3 sc in next st for turning (mark the centre st), add 7 (10,10, 11, 13) sc along right neck (adding sc2tog over last unworked st and hdc2tog), add 13 (14, 15, 16, 17) sc along back of neck, add 7 (10, 10, 11, 13) sc evenly along left neck (adding sc2tog over hdc2tog and the next sl st), add 3 sc for turning (mark the centre st), add 28 (32, 35, 37, 41) sc to bottom.
[If you think that you have fewer or more stiches, feel free to add more or remove some stitches. Evenly space the buttonholes while crocheting row 3, according to your new st count.]
Row 2: ch 1 turn, sc in each st adding 3 sc into the centre marked stitch.
Row 3: ch 1, turn, add sc in next 3, 3, 2, 4, 3 sts, *ch 2, skip next 2 sts, sc in next 4, 5, 6, 6, 7 sts*, repeat from * to * 3 more times, ch 2, skip next 2 sts, sc in next st. Continue working necklines as previous row (adding 3 sc in centre stitch).
Row 4: ch 1 turn, sc in each st and ch spaces, adding 3 sc in centre stitch. Fasten off.
Armhole edging:
Row 1: Join yarn at the centre of armhole sts. Ch1, add sc evenly across armhole, join with sl st to the 1st sc.
Row 2-4: Ch 1, turn, sc in each st, join with sl st to the 1st st.
Fasten off.
Finishing off:
Weave in ends, using yarn needle & sew on buttons to correspond to the buttonholes.
I would love to see your projects. Use tags #Joyofcreationcrochet and #elysianbabyvest


Comments
Post a Comment